
It's official! My revamped blog (which has been neatly incorporated into my new website) is up and running. Visit me here. Bookmark the new place and feel free to stop by often. I'm baking cookies as we speak.
 This month could go on record as the most neglected blogging month thus far, but I'd like to think I had good reason. Besides juggling a very steady workload at Daley design, I've been getting to know my new licensing agent and publisher.
 As of Friday, it's all official. I've placed years of work in very capable hands and have joined what feels like an extended family over at Penny Lane. I'm so excited to go forward with this partnership. It's a new beginning that I can't wait to have unfold.
  The short list including really good ice cream on an equally delicious sugar cone; night rains so there's no need to remember to water flowers during perfectly sunny days; perfectly sunny days; finishing projects that seemed endless; eating dinner outside; planning vacations; anniversaries; hanging out with old friends; time at the pool with a pile of unread magazines; painting ice cream cones; finding cute shoes in a size 11 (that's not a typo); smores; listening to 5-year-old sandbox banter; sleeping in; being loved; being missed when you go away; having a job that doesn't feel like a "job"; movie nights with buttered popcorn; coffee in the morning; keeping up with the laundry; blue skies; being trusted with preteen secrets; long days and ice cream. It's worth mentioning twice.
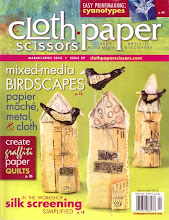
 Somewhere in between design projects, website redesign (yes, it finally is coming soon!), end-of-school madness and pursuing several art opportunities, I found time to do a little shopping. Imagine that. My friend Robin has a completely gorgeous etsy shop called Well of Creations. She crochets one-of-a-kind pieces including totes, yoga mat bags, wrist cuffs, headbands and the most charming business card/coin holders like the one you see above (that's mine, but I bet Robin would make you one like it if you asked nice ; ) Many of her items feature personal touches like that hand painted flower patch.
 Check out Robin's shop and tell me she doesn't have an eye for rich and unique color combinations. I'm ready to purchase a yoga mat and carry it to my pretend yoga class, just so I can buy this bag for it.
  We're especially loving the flower headbands. They tie in the back so one size really does fit all.
 Finding a headband that stays put and fits plus "is comfy/doesn't itch/bother my head/looks stylish and cool" is truly a challenge so these were pretty exciting finds.
Robin is also sponsoring a fundraiser. All proceeds from her wrist cuffs go to educating impoverished girls in India. She's been featured on the msnbc news feed here.
Just in case you needed another excuse to shop.
 These days I'm really busy. Busy with more work and projects and ventures than I've had for awhile. And that's saying a lot. I could easily let myself drown if I'm not careful. But today I woke up and stubbornly decided that work or no work, I was not going to miss strawberry season. So the girls and I took off for the pick-it-yourself field right after they rubbed the sleep from their eyes.
 I'm thinking it's important every once-in-awhile to get the behind-the-scenes tour...
 and keep in touch with where food really comes from...the beginnings, the inbetweens and the delicious endings.
 Nora stayed close while Cara wandered the field in search of the very best berries (but we won't go into my sweet picker perfectionist : ) While I was busy filling our strawberry bin, Nora took my camera to snap a few of her own strawberry photos. Here's what I saw her carefully arranging and photographing when I turned around...
 We managed to pick nearly 15 lbs of berries in under an hour. Strawberry shortcake is on the menu tonight and tomorrow and maybe the next night.
 Back at the strawberry weigh-and-pay, we met some fuzzy duckling friends that amused us and yes I'll admit to having a sudden urge to paint ducks.
 Don't take that title literally. I would eat worms before I ever personally drove through the heart of New York City. I'm talking about learning to drive with an art license. Surtex has been forever on my radar as the place to go to figure out the business and put my big foot in the door. While I didn't feel ready to exhibit/invest in a $4000 booth, I did think that it was time to see the show and take in the entire conference program to better educate myself. So I made the plunge and spent the past three days learning everything I could. Art licensing was a hazy, intimidating subject to me only months ago. Now that world is suddenly becoming clear. I made several excellent contacts and I can say with some certainty that my career is ready to take some exciting turns (not without hard work, but I'm feeling ready.)
 While I was mainly focused on Surtex, I did have a sliver of time to catch some New York sights. Sights mainly geared to places where I could pick up surprises for my well-behaving...ahem...kids back at home with their Dad.
 This impostor had to suffice for the real thing. I'm sure I'll be back some day to properly see New York. In the meantime, I'll keep you posted on what develops. I do believe that the first step to pursuing anything you might want to do is learning everything possible about it. Education brings comfort. Maybe not enough to ride in a NYC taxi without several seat belts strapped around yourself, but enough to hail the next ride with confidence.
 To be honest, when the Illustration Friday prompt came this morning I wasn't exactly running for my brushes filled with inspired bliss. "Equipment" brought images of tractors, backhoes and other heavy machinery...technical, mechanical kind of stuff that didn't speak to me. However, I was determined to participate. So I looked "equipment" up in the dictionary rather than settle for my preconceived, stifling notions. Definition #2 felt more comfortable:
  That's what I love about Illustration Friday. A common word is able to produce a wide range of inspiration and images.
 This carefully chosen gift made me laugh out loud. All I had asked for today was a little peace and quiet...but I'll take humor too. And whom do you suppose will be making pancakes this week?!
 An antique luggage rack has been on my rummage/yard sale radar for a loooong time. When I spied this one two weeks ago (priced at $4), I grabbed it immediately. Luckily, there were no injuries. I had plans for this rack to live in our guest bedroom so suitcases would also have a nice place to rest.
 I didn't even think twice about those worn ribbons.
 Instead, I saw a beautiful and functional piece of furniture that was perfect for an easy makeover project.
 I happened to have this ribbon in my stash (also purchased at a rummage sale in a box like that one.) It was exactly the right width and had the same charm of the original luggage rack ribbon. I knew it was meant to be.
 It took about 30 minutes to transform my find including the ribbon replacement and a good polish. A project that was finished up just in time for our guests over the past weekend. Suitcases are now within arms reach at this hotel. And we don't even charge extra.
 Over the past weekend, I managed to find time to squeeze in a couple of rummage sales. This is my absolute favorite way to find materials for mixed media paintings and sewing projects. Supplies purchased like this are a mere fraction of the retail price. Besides you can't find trim from the 1940s at your local Michael's.
  Yards of fabric...
 Lace and trims.
 Hundreds of buttons...
 A rainbow of rick rack, seam binding, bias trim, elastic (most unopened)...
 Charming wooden spools of thread, measuring tapes and old sewing notions. The box also contained half yards of colorful fleece (perfect for kid projects), unopened ribbon spools, crochet thread and tulle.
  Love the earth for the sake of us big peeps...
...and the little ones too. What a gorgeous spring day for a celebration.
Prints of Love the Earth are available in my etsy shop.
 Five-year-old Nora is definitely on a roll. She's learning how to communicate with words and pictures and can't get enough of documenting everything. Nora spent the better part of yesterday preparing for family movie night. She made tickets, money and the sign above. (That's MOVIE with the extra "V" corrected, 8:00pm with drinks and popcorn and a cost of $5...play money accepted.) When she asked me if she could tape the sign to the door of the movie theater/aka Mom and Dad's bedroom I said something like..."No tape on the doors. It takes off the paint and makes Daddy nuts." Admittedly, I was working at my computer and only paying half attention. I felt her disappointment about the no tape, but I repeated that she would have to find a different way to hang her sign. She thought for a moment and then skipped off as I continued to work.
 I did a double take when I went upstairs and saw Nora's creative solution to sign-hanging without tape. A great reminder from a preschooler that with a little creativity and drive there's always a way around potential roadblocks life throws our way.
  Nora seen composing our Friday-To-Do List using preschool shorthand.
  Somehow we spent too much time at the "L" and got behind with things. Friday priorities. I'm sure going to miss my little helper when she checks into kindergarten next year.
Now back to our last to-do's...
zzzzz.
 I love having artists as friends. Not only do they challenge and inspire me, but they're generous and supportive. Did I mention creative, fun and unique? I treasure them all. I was delighted to find this package in my mail from a fellow Art of Can artist. The wax seal is a big clue as to what lurks inside...
  The amazingly talented and creative Dale Busta (the guy who has won Red Bull's Art of Can like a zillion times) sent me one of his trademark aluminium can bees.
 Dale burns the label off the can and welds the pieces together somehow (I won't even pretend to completely understand his process.) I do know that the craftsmanship and attention to detail is incredible. And if you ever have a project (or want a bee of your own) contact me and I'll put you in touch with Dale. I don't think there's much that Dale can't figure out how to make.
 Speaking of things that fly, do you remember these? Our family went out to dinner at a place that creatively served up kid's meals on Frisbees. I'm in shock that my kids had not recently handled or played with this classic toy, but now they're hooked. We're all having a great time rediscovering the Frisbee and loving a restaurant with a worthwhile take home toy.
 I just finished the above painting which was inspired by the spring rain and this week's prompt over at Illustration Friday. In case you're wondering about that, the theme of the week was "Dip." However, I read my weekly e-mail reminder really fast and saw "Drip." So all weekend, I'm thinking and painting "drip" which led to water, rain and flowers and how the very toughest moments in life prove to be the ones that reward us in the end with inspiration and valuable life lessons.
  I probably could have skipped the true confession paragraph above and played off "dip" with this painting...(not me, ahem, but: the flowers were dipped in rain drops giving them the strength to bloom even brighter) However, that wouldn't be keeping it real, now would it? And I would never lie to you. Just a self reminder to stop and smell the flowers/slow down especially when reading e-mail. : )
 Sweet wishes from me to you for a bright and cheerful Easter day. In between our celebrations over here and waaay too many chocolate eggs, I'm finishing up a new painting. Hopefully it will be ready for show tomorrow. And don't let me forget that somebody needs to eat all of those hard-boiled eggs in the next few days. We need an eat-as-many-as-you-decorate rule.
 So tell me, just how is one supposed to work with all of this going on outside? It's been taking my very best focusing skills to get just a little done.
  I've also been on a major decluttering kick...I'm pretty sure there's something in the air that demands it. Six stuffed garbage bags and five very large pieces of brightly colored plastic (several with wheels) are outta here. What a feeling that is.
 And we couldn't wait one second longer to decorate our eggs that happen to fit right in with the vibrant landscape. We're so happy to have our spring back. I'll be returning soon with cookies to properly celebrate.

 Today's the day. Nora officially turns five. The quickest five years ever I might add. Nora didn't manage to nail down exactly what type of cake she wanted before the cake order deadline. However, Nora's clever mom decided to attempt a Barbie Merliah mermaid cake timed to the release of the new movie. Not that I didn't get helpful hints in the last few days...
 Nora: "Hey Mom, did you now that Barbie in a Mermaid Tale is being released on DVD this week?"
Mom: "Really. Isn't that interesting."
Nora: "Yeah. It's in stores now. I sure hope someone gets that movie for me for my birthday."
Mom: "Nora. Nora. Nora."
Nora (shrugging shoulders): "Well, I'm just saying."
 When Nora saw her cake for the first time she called it, "AMAZING" and "the BEST birthday cake ever." Pretty high praise. Although catching her staring in awe at the cake was even better. I knew she meant every word. Nora didn't see the imperfections that I did. She thought the cake was perfect and so it was.
In the end, lucky Nora did get her movie (after all those not-so-subtle-hints) and she got to eat her favorite cake too. Another perfectly happy birthday.


