Showing posts with label decorating. Show all posts

Sunday, January 31, 2010

De-Muddling

Maybe it's that time of year or the weather or something, but I've recently caught myself starting to google, half-seriously, "What should I do now?" If only I could bing the Internet to provide a personalized step-by-step artistic path...what to prioritize and/or what to let go. Cold, dreary weather is a creative drain. Fortunately, I was able to snap out of it this weekend to organize my studio. In the process, I realized a thing or two.

I'm pretty sure that one of the best cures for a muddled and disorganized head, is a neat and organized work space. Messiness is distracting.

I marvel at design, craft and sewing books that manage to keep a single focus from beginning to end with beautifully, illustrated step-by-steps along the way. This is not possible in actual life.

I believe in being prepared for any occasion. However, it's also important to be able to see what you already have.

I sorted through overflowing fabric bins and let go of uninspiring pieces. Extra stuff adds weight rather than inspiration.

Now the challenge is to keep things in place while I let go of January. Hello to a clearer, warmer (fingers crossed) and brighter February.

Tuesday, November 17, 2009

Hanging Acorn Frame tutorial

My girls and I went for a fall walk the other day. Crunching under our feet were hundreds of little acorn hats. We stopped to inspect them closer, loving their tiny details...an absolutely gorgeous crafting material. We collected as many as our pockets could hold and brought them back to the studio for some acorn brainstorming. While my daughters dreamed up a family of acorn people, I worked to create an acorn frame with a hanger.

materials needed:
acorn tops of various sizes
flat wooden frame with at least an 1 inch border
hot glue gun
brown craft paint
paintbrush
20 inch piece of 1/2 inch wide brown ribbon
a photo or piece of art to frame

step one.
Remove the glass and back of the frame for crafting purposes. Paint the frame with brown craft paint.

step two.
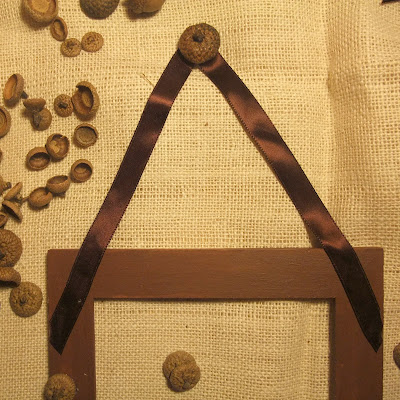
Attach the ribbon middle to a large acorn top by hot gluing the ribbon into the acorn.


step three.
Hot glue the ends of the ribbon to the top of the front frame corners like so.


step four.
Hot glue acorn tops to the front of the frame. You will cover where the ribbon was previously attached.

step five.
Insert the frame glass along with a photo or a piece of original art and hang your finished creation on a wall or a doorknob.

Giving thanks for the little things including time to paint, craft and look for acorns. : )

Tuesday, September 29, 2009

Finding JOY

When I entered the scene of a particular yard sale a month or so ago, I almost turned around and walked right back out before doing a thorough investigation of the goods. At first glance, the sale seemed to have an abundance of overpriced Tupperware and plastic novelties. But since I had taken the time to stop the car, I figured I'd at least check out the pile of books on a back table. And that's when I saw it. A small box shoved to the side. I gulped. Vintage scrabble?! My heart skipped a beat. There wasn't a board, but the letters and letter racks were enough for me. With the asking price of 50 cents for the set, I realized that some people value Tupperware, while others prefer vintage letters. Absolutely nothing wrong with that.

I knew those little blocky letters would be great in a mixed media piece, but I also realized they were cool enough to stand on their own. So I spelled out our name and let them rest on the light switch plate in our entryway. Hubby please stop reading...

(actually they are attached to the wall with a little dab of hot glue. Yes, I was aware that the painter of the house would not be happy with the decision to take a glue gun to the walls, but at least it's not hay or plastic flowers, right? ...anybody see those Trading Spaces episodes??!)

Hubby continue reading...

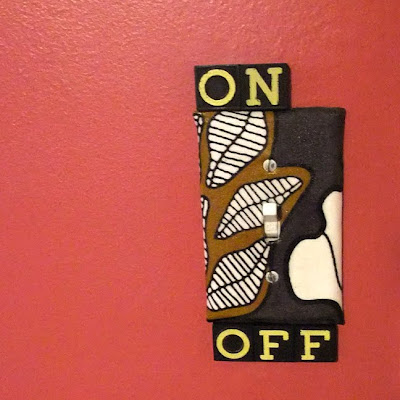
I also came to the conclusion that my fabric covered studio switch plate could benefit from letter additions so I "attached" more tiles. I love spelling out the obvious.

Less daring I suppose is choosing to display a word on one of those charming, old wooden racks. The X is on its side on purpose. You get it right?!

This also spells what to do when you discover how your wife attached scrabble letters to the walls. XOXO : )

Monday, August 17, 2009

Chalk it up

Here's a summer project that's been on my list. I've had a quart of chalkboard paint in my studio closet for the longest time. My original intention was to add some chalkboard real estate to the basement/kids area. However, my recent read of Jen's blog about her chalkboard paint tray transformation inspired me to do something similar, but I changed my chalk tray up with a button twist. (disclaimer: please don't worry as the poor children weren't left out of the quart...this tray was in addition to giving them chalk space, but that's another post.)

If you don't have one of these that you're willing to transform, don't fret. Any respectable thrift store will have a few to chose from. I purchased my silver tray at a yard sale for 25 cents. I wanted something simple with an easily embellish-able edge.

First, I primed the entire tray--front and back--with a spray primer (don't skip this step...it makes tray painting so much easier!) Next, I used white spray paint to cover the entire front and then back of the tray. After that was dry, I applied chalkboard paint to the inside of the tray leaving the rim white. I needed two coats to get maximum coverage.

Let's take a moment to talk about my button collection. I've been snatching them up for years at thrift stores and yard sales. Is it possible to have too many buttons?! I was proud of myself for actually using a small part of my button stash for this project. I tend to have some hoarding characteristics when it comes to buttons so this was good therapy.

Back to the tray, starting at the inner edge of the rim (where the black meets white), I attached various sized buttons. It's kinda like a jigsaw puzzle fitting the right size button into the space. I kept my button palette mostly in the white family, but inserted a few chalky colored buttons for interest.

tahDah! I positioned my finished plate on a plate stand (a stand that was an ugly bronze, but a quick coat of black spray paint changed all that) and wrote my welcoming message.

I'll undoubtedly personalize the message for the various family and friends that visit and stay in our guest room over the year. We love our visitors, so I'm very excited to have this extra welcoming touch.

Thursday, April 2, 2009

Making it up as I go

I decided it was about time I signed on to be a vendor at an art fair. It's one of those things that I knew I wanted to try on for size sooner or later to see if we were a fit for each other. So when opportunity knocked, I answered and signed on for what I felt was a good fit for novice me (good fit for my first show = one day, inside, laid back yet professional, whimsical vendors with a humorous, friendly organizer.) Now with a little over a month to go, I'm working on my booth design. If you've ever peeked over at my etsy wares you know I'm all about bright colors and fun. The goal is for my booth to match, yet not overpower the goods. My vision includes a pennant garland to add to the festive atmosphere I'm working to create. I didn't use a specific tutorial or anything to make...this wasn't wheel invention. I just created a triangle shape from cardboard for a pattern, then cut, interfaced and pinned together more triangles than I ever cared to count.

For the triangles, I used three solids (found at yard sales for pennies) and then sprinkled in my more cherished prints. I powered up my sewing machine and had fun sewing triangles with funky multi-colored thread and zigzag stitches. Nothing too serious...this garland was all about having a good time. Next, I laid out a pattern of sewn triangles (yes, there is a pattern, but heck no, it's not obvious.)

After rummaging through my rick rack box, I found yellow bias tape perfect to string the flags together. (disclaimer: my rick rack box filled with vintage bias tapes, trims, etc. does not exist due to years of sewing. I picked it all up at a yard sale years ago before I sewed anything more than buttons. I
knew it was a jackpot for $1, even though I had no idea what to do with the stuff. Self pat on the back...glad I didn't pass that find by.)

Yards and yards of flag later, I can check 'garland' off my booth prep list. Next up is signage. The 3' x 5' piece of primed canvas I ordered from Dick Blick came in the mail yesterday. I'm excited to roll that baby out on the floor and go to work. I'll keep ya updated as the days tick down. It's exciting to see it all come together. Making up a space design and loving it.

Monday, March 2, 2009

take this winter

i admit it. winter is getting to me. At least there are no signs of a monochromatic landscape on the inside. After getting my new toy for Christmas, it occurred to me that I didn't have to settle anymore. Settle for the ordinary curtain pickings I was finding in stores. I might not be ready to take on zippers, but I can certainly sew a square panel. And so I present...my first long panel curtains made from six yards of Anna Maria Horner's Garden Party fabric. What you're seeing above is our second floor landing space. If I land anywhere, I think a garden party would be a nice spot to do so.

With my sewing machine on fire, I also took the time to whip up some funky flowers. These are sewn from muslin with a wooden dowel stuck in for the stem. Then I poured out the brightest, happiest paint palette I could and went to work. No more winter doldrums here. Have a bright Monday!

Monday, February 16, 2009

Etsy finds + a giveaway

I'd been looking for the perfect pin cushion to celebrate my return to sewing. Of course I went right to Etsy where I knew there would be endless options. I ended up purchasing this handmade pear from retro mama. I absolutely love it. So much in fact that I'm having a hard time bringing myself to actually stick pins in it.

A month or so ago, I was lucky enough to win a vintage wall chandelier vinyl decal from another Etsian. Scribble It sells a large variety of custom vinyl lettering and wall art for home decor, businesses and vehicles. I "hung" my prize over one of my computer stations. If you haven't tried vinyl art yet, check it out. It's really easy to put up and surprisingly affordable.

Speaking of giveaways, if you head over to Simple Finds and leave a comment you will be entered to win one of my 8" x 10" 'My Kitchen' prints. Be sure to enter before Thursday, February 19th.

Hope you're having a relaxing President's day. I've managed to fit in a hair cut & color and after all of that beautifying, a much needed snooze. Back to work tomorrow.

Thursday, January 1, 2009

New threads

I feel like I'm waking from a long, dreamy nap...you know the kind that makes you question where you are, what happened and what time is it already?! The past week flew by like that. Actually, I'd say right after Thanksgiving things were on fast forward and haven't stopped since. Our family had a great time celebrating the holidays with friends and family. The above was one of my favorite gifts. A very modest, beginner-style sewing machine. Perfect for someone who said to her helpful mom..."You mean thread comes down from the top AND up from the bottom?! At the same time! WOW." And that would not be my daughter talking to me, but me talking to my mom who guided me through my very first sewing project.

disclaimer: I did have a Holly Hobbie toy sewing machine way back when, but that couldn't really be classified as sewing could it?

So from a "Pattern for Dummies" with Mom standing by, I made this table runner for the dining room. It even has a fancy navy cord detail on the edges that is hard to fully appreciate in this photo. Trust me it's there and I have to say I'm pretty proud to have managed this.

After the runner, the sewing bug officially took hold. A day or two later, I wandered into the fabric section at IKEA and fell in love with this fabric. And like many of my project ideas, I couldn't sleep until I had whipped up two valances for my office with a touch of vintage brown seam binding. This project was a little bumpy with no pattern or Mom to guide me, but I'm getting better.

Two no sew projects (my specialty) also happened over the last week. First, I decided to cover my drafting table chair. I used my fancy upholstery tool a.k.a.flat head screw driver to shove fabric into the crack between cushion and rim.

This actually was a piece of cake. That fabric is wedged in really tight and is nice and smooth all around. Now I've got a spiffy "new" chair for a new year of art.

Finally, Modge Podge and leftover fabric scraps transformed my office switch plates. Another easy, inexpensive, satisfying kind of project. So besides the usual holiday stuff, you've caught a glimpse of the threads I've been working on here. Time to flip on 2009. Happy New Year to you!

Wednesday, October 29, 2008

The van gets a trunk

Yesterday after dropping my youngest at preschool, my van shifted into auto pilot and took me right to my favorite thrift store. It tends to do this every few weeks or so. I try to act relatively cool at my thrift haunts, but I could feel my mouth making a big WOW when I saw this.

An absolutely gorgeous antique trunk. The best part (besides the price) had to be the shipping labels all over the back and sides. Remember when people shipped their trunks i.e. railroad travel and all of that?? Me neither, but I've seen it on TV. The incredible weathered colors and markings made by time on this gem are simply amazing (and if I could figure out how to make my pix larger than "large" on my blog I'd blow these babies up so you could see even better.)


I love the bits left of the broken handle. Not that an intact handle wouldn't have been nice. It was quite a trick both lugging this awkward, huge thing up to the register and getting it out and into my van.

And then there's the hardware...

Here's a closeup of the inside lined with ghosts from the past.
I want to put this awkward 50lb+ trunk on my scanner and scan every inch. However photos will have to do. Wouldn't the above make a great background/starting point for a collage?
(I left the pix big here so if you click and print you can do just that.)

I know this isn't the best use or place for my Tuesday find, but for now it'll sit here as a printer stand. I'd love the trunk for a coffee table, but I can see my three dears picking at the barely-still-intact mailing labels and therefore causing a mother to yell...LOUD.

The other best part...the price. I even shocked my husband who is used to my bargain hunting prowess. I purchased this trunk for a mere $4.00 (USD). Kid you not. That's why it's just silly to ignore your vehicle when it wants to take a quick jaunt to the thrift store.

Tuesday, September 30, 2008

drumroll...the studio reveal

My new studio has been complete and functioning since way back in July (remember I talked about it right here first??) but somewhere along the way I got too busy to have a proper studio warming. THEN the timing of editors pulling together Cloth Paper Scissors' latest Studios edition aligned my studio completion. Before I knew it I got to be a part of this way cool, completely gorgeous magazine which just hit newsstands a week or two ago.

Starting on page 18 you can read all about yours TRUE-ly, which in fact is aptly named. You see if you glance back here my studio ended up looking nothing like the original plan.

Somewhere along the way, I thought my studio needed to be totally neutral to make art so I wasn't color biased or had walls competing with what I was creating. Like cream walls or something. My house does not have one single boring cream wall so why would I think my studio--the place that is supposed to represent me the most--should? good question. I think I got confused and anxious. All of this pressure to create a "me" space. So my husband (dear) painted not once, but twice. And if you're wondering, yes I do hear about that often.

I can't tell you how happy it makes me to work in this space. I especially LOVE the windows. After having my office/studio in the basement for 10 years having windows with light (that even open!) is quite a luxury. The bones of my new studio were designed and installed by CA Closets. They worked with me to create a highly functioning space.

The final winning colors of the room were raspberry, pumpkin and sky blue. My neutrals.

I found these drawer cabinet things at a yard sale years ago.I purchased two for $15. I love, love, love them. No sense not incorporating them into my new space. I also kept my beloved college drafting table. My office splurges stayed in check by keeping pieces that were already working for me.

Here's a peek into my newly organized closet with ribbon rolls. Look out Martha.

I design and e-mail here. See how the light from the window touches my back? Love it.

So I hope you've enjoyed the tour. I highly recommend picking up CPS Studios if you're looking for inspiration or just eye candy. Tis the season. And it's low-cal unlike that bag of candy corn that I have stashed somewhere in my studio...and don't think I'm telling where. ; )