Wednesday, November 25, 2009

Happy Thanksgiving

I have many things to be thankful for this year including the biggies...family, friends, faith, health and home. Of course that's not forgetting the little pleasures like making art with zippers and lace : )

Thank you for stopping by throughout the year and for your comments and e-mails. I treasure the inspiration and friendship that those words bring. Have a happy and safe holiday!

Tuesday, November 24, 2009

A playful dishtowel tutorial

I'm a huge fan of this store's artsy dishtowels. I figured it was about time I made a few myself. After all, when you break it down it's just a fabric rectangle with trim and applique, right? The Totally Tutorials supplies/tutorial exchange with Ruby Jane's Retro fabric was another spark that led to this project idea. If you were here yesterday, you read about that and my final piece of inspiration...a newly acquired, 1944 children's dictionary.

These fabric ink jet sheets have been waiting ever so patiently on my shelf for some time. Finally, they had their day. I loved the entries from my new (old) book and how they "played" off the fabric swatch from Ruby Jane. Here was the perfect opportunity to combine her fabric, a bit of the dictionary and experiment with the fabric sheets.

First, I scanned in the definition of play from that charming dictionary. I followed the fabric sheet directions by loading a single sheet into the printer and printing. I then did the colorfast treatment according to the package. The entire process went smoothly with no ink bleedage or distortion. I really can't believe I haven't tried this until now.

other supplies needed include:
fabric swatches (click here for Ruby Jane's shop)
fusible web
21" x 29" piece of heavier fabric (main body of dishtowel)
trim
scissors
sewing machine
coordinating thread

First, iron the edges up and under approx 1/4 inch in on all sides of the dishtowel fabric. Then pin and sew close to the inner edge.

Iron fusible web to the back of all fabric swatches. Peel off paper backing. Arrange and pin fabric pieces on the dishtowel. Iron fabric swatches to the towel.

With contrasting thread, zigzag-stitch around the various fabric pieces.

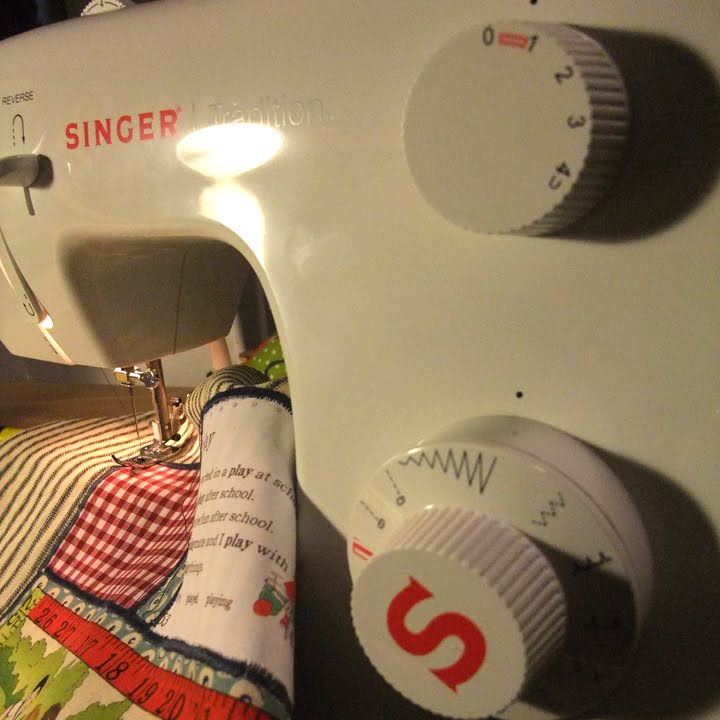
Here's a peek at what my machine was set at for this part.

After the applique pieces are stitched, pin ruffle trim to the bottom and top edges of the dish towel. Next, sew the trim to the front edges of the dishtowel.

Finally, attach red trim on top...reminiscent of the fancy borders from the original children's dictionary (note the right edge of the "play" definition fabric snippet.)

And there you have it...a playful, retro dishtowel whipped up in under two hours to add a bit of whimsy to your kitchen or to gift. I can hardly wait to make more dishtowels integrating initials, recipes, photos...all kinds of personal touches turned to fabric as easy as clicking "print." And make sure you visit Ruby Jane's shop for Anthro-like retro fabrics. You know what they say about all work and no play... ; )

Monday, November 23, 2009

Piecing together inspiration

A few weeks or more (that's heavily leaning on the "more" side), the sweet Ruby Jane from Ruby Jane's Retro Fabric selected me and others to create tutorials with her fabric. This is part of the exchange program over at Totally Tutorials which connects supply sellers to creative types with free supplies for tutorials.

I was completely charmed by that little piece of nostalgic fabric when it arrived. I turned ideas over in my head. I wanted a project that would go together in an hour or less (for this crazy time of the year), but that involved my learning at least one new technique and/or experimenting with one new material.

In an unrelated yet related venture, I happened upon this charming 1944 children's dictionary at a rummage sale. It was a no-brainer purchase. And it reminded me of the exchange fabric and how I needed to get a tutorial out into the world. After all a deal's a deal.

Paging through this dictionary was delightful. I scanned a few snippets of my favorite smile-inducing definitions from the book.

I love the colorful, scalloped edges on the sides of the pages and all of the fancy trims used throughout the book. As I was reading this dictionary page-by-page, something clicked. I had an idea for my tutorial. The final product wouldn't be wheel invention, but it would combine nostalgia with practical and provide an opportunity for me to experiment with an unopened material that's been on my shelf for some time. And I realize I'm being all secretive-like, but I had to explain the inspiration before the project. And honestly the project is not quite done yet, but I promise the easy step-by-step tutorial is coming up next. Perfect *I think* for holiday gifts.

Tuesday, November 17, 2009

Hanging Acorn Frame tutorial

My girls and I went for a fall walk the other day. Crunching under our feet were hundreds of little acorn hats. We stopped to inspect them closer, loving their tiny details...an absolutely gorgeous crafting material. We collected as many as our pockets could hold and brought them back to the studio for some acorn brainstorming. While my daughters dreamed up a family of acorn people, I worked to create an acorn frame with a hanger.

materials needed:
acorn tops of various sizes
flat wooden frame with at least an 1 inch border
hot glue gun
brown craft paint
paintbrush
20 inch piece of 1/2 inch wide brown ribbon
a photo or piece of art to frame

step one.
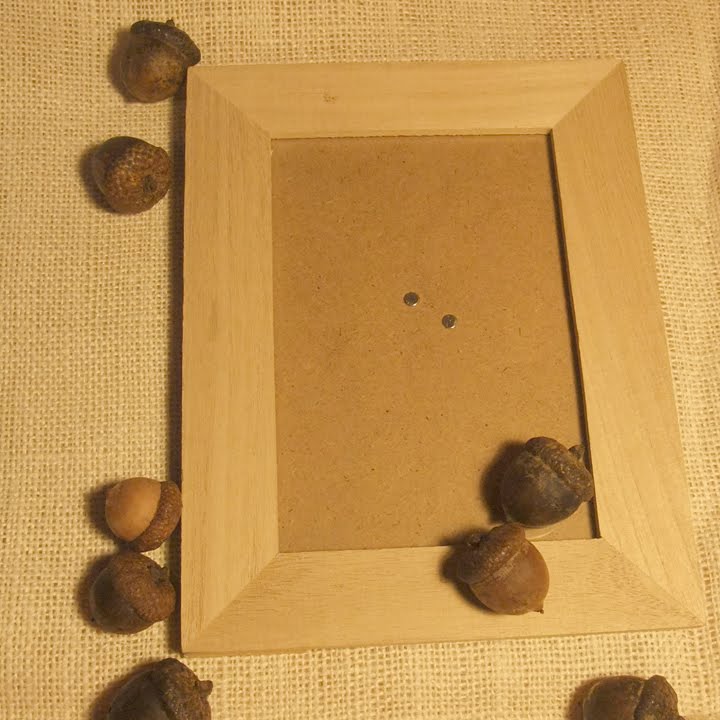
Remove the glass and back of the frame for crafting purposes. Paint the frame with brown craft paint.

step two.
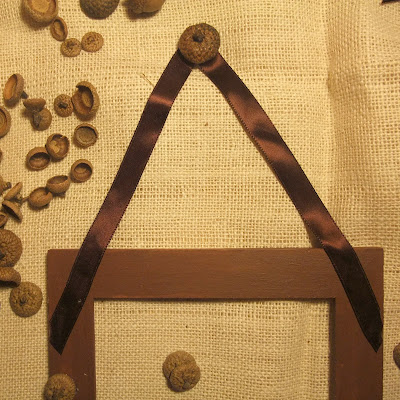
Attach the ribbon middle to a large acorn top by hot gluing the ribbon into the acorn.


step three.
Hot glue the ends of the ribbon to the top of the front frame corners like so.


step four.
Hot glue acorn tops to the front of the frame. You will cover where the ribbon was previously attached.

step five.
Insert the frame glass along with a photo or a piece of original art and hang your finished creation on a wall or a doorknob.

Giving thanks for the little things including time to paint, craft and look for acorns. : )

Sunday, November 15, 2009

When Autumn gives you apples...

Homemade apple pie is something I crave every fall...errrr actually I crave throughout the year, but even more so when the leaves are changing and the air is crisp. I've found the best apple pie is made with a combination of different apples for a variety of tastes in each slice. My favorite mix is Granny Smiths and Jonathans. I also prefer a crumb topping rather than a top crust. Without further chitchat, here's my favorite recipe for a delicious apple pie.


apple filling:
6 cups thinly sliced, peeled apples
1/2 cup sugar
3 tbsp. all-purpose flour
2 tsp. ground cinnamon
1/8 tsp. salt

The bottom crust can be your favorite single crust pie recipe or a refrigerated Pillsbury crust...promise, I won't tell ; ). Line the pie plate with the bottom crust and add a fancy cookie cutter edge, if you desire. Then fill with the apple mixture from above.

To make the crumb topping, stir together:
1 cup packed brown sugar
1/2 cup all-purpose flour
1/2 cup quick-cooking rolled oats
Use a pastry blender to cut in 1/2 cup butter or margarine till the topping mixture resembles coarse crumbs.

Sprinkle the crumb topping over the apple mixture. To prevent over browning, cover the edge of pie with foil. Bake in a 375 degree oven for 25 minutes. Remove foil and bake for 25-30 minutes more until the pie top is golden.

Remove from oven and cool. Send hubby to store for forgotten vanilla ice cream and enjoy.

I'll be back soon. Many projects were wrapped up last week so now I'm enjoying time for things like pie, crafts and our nearly complete renovated bathroom! Hurray for Fall!

Also perfect for the season...a recipe for Gratitude rolls over here.

Monday, November 9, 2009

I can't tell, but you can guess...

This year, I'm participating in Cincinnati's Secret Artworks auction on Friday, November 20th. Secret ArtWorks is a fundraising event featuring the exhibition and sale of 5" x 7" works of art from local, national and international artists. All works of art sell for $75 each. The 'secret' behind each piece is the identity of the artist which is revealed after the work is purchased. ArtWorks is a non-profit arts organization that connects artists of all ages with opportunities in the arts through inspiring apprenticeships, community partnerships and public art.

Check out the hundreds of pieces already submitted for this year's event. I have three pieces among the entries. Any guesses? If you're in the area, tickets to this really fun party that benefits a worthwhile cause can be purchased here. I have my eye on a couple I'd like to be lucky enough to bring home...that's providing we all stay healthy and I can actually attend. By the way, I'm feeling much better (after accepting defeat and going to the doctor)...thanks for the well wishes. : )

Wednesday, November 4, 2009

A view from the deck

This is not a deer farm, but rather my urban backyard. On any given day of the week we can peer out the windows and see our friends frolicking...eating from bird feeders, munching on shrubbery and flowers without a care in the world. Deer like it here and feel very, very comfortable. They don't seem to care that this is not suburbia or a place where there should be large quantities of wildlife (sorry Dad.) And me? I'm officially sick after being in denial throughout the weekend. I'm afraid it's payback time. My body is not happy about my refusal to pass on parties and other Halloween festivities when I knew better. Really I did. So here I am, showing you pictures of female deer rather than an interesting project. Now, I need to doze...not eight. (sorry...toomuchsinusmedicine confusing bad deer joke.) Off to rest.

Saturday, October 31, 2009

Have a hair-raising Halloween

We're busy today getting costumes together, candy ready and pumpkins carved for the big night. I'm taking a short break from our halloweenish prepping to wish you fun and safe trick-or-treating and share a truly unique, completely cute costume.

Meet Nancy from Oklahoma. Last week, Nancy ordered several packs of frustration pencil kits mentioning that she was going to dress up as a giant frustration pencil herself! I had never met Nancy, but thought to myself how she had to be a pretty fun gal. I asked if she would share a photo which she kindly did. I'm loving the hair. Nancy passed out frustration pencils to her coworkers yesterday and won third place in her office Halloween contest! Way to go Nancy!

Now off to carve our pumpkins...

Monday, October 26, 2009

Turning the pages

I'm so pleased to have my art included in the latest *gorgeous* issue of Cloth Paper Scissors. There is a ton of amazing work in here. I especially love the "Stuffed Horse Ornaments" by Samantha Jenkins and "Everyday Women" by Nola Hart, but that is naming just a few for sure.

My article included in this issue provides a step-by-step to creating art with flashcards. I promise, it will get you thinking about equations in a more artistic way.

The original flashcard pieces featured in the article are now available for sale over in my etsy shop. These pieces have been created on vintage self-hanging plaques so there is no need for additional framing. Prints of the originals are also available.

Okay back to sick kids. That certain flu has officially hit our house...yes it's definitely multiplying which means my undivided attention has been focused on sanitizing and taking temperatures. As a result, we had to subtract our weekend travel plans. Nothing more to add to that (except of course to bug you with math puns. Sorry about that. : )

Friday, October 23, 2009

When a spider leads to a pumpkin

Inspiration is a funny thing. It begins as a spark and catches quick if you let it (kind of like a certain flu you may have heard is going around.) In the case of inspiration, it's a good thing (the other, not so much.) I 'll admit that when I'm asked to help with 5th grade math I don't jump quite as fast as when my 7-year-old son (or any child for that matter) comes to me asking for help with a craft idea. Brendan thought the spider pincushion I made earlier this week was pretty cool. He told me he had another idea for a pumpkin pincushion and wondered if I could help him make it. Let me tell you, when my sports driven-nintendo playing-legoite-son asks to make a pin cushion you had better believe it gets my attention.

We quickly gathered our supplies which consisted of orange fabric, orange thread, a bottle cap, fiberfill, black felt and a green chenille pipe cleaner. Then using the exact same technique as with the spider body, I guided him in the making of his one-of-a-kind creation. After Brendan had the pumpkin all sewn up, he cut the eyes and a mouth out of the black felt and attached with liquid stitch. Then, he cut a bit of the chenille pipe cleaner for a stem and inserted it in the top of the pumpkin. Finally, Brendan added a few pins to top off his completed pincushion. He was so proud he even brought it to school to show the class.

While this cute pumpkin is smile-inducing on its own, it's the fact that it was created from a tiny spark of inspiration by a 7-year-old boy that makes me smile the most.

Monday, October 19, 2009

Bottle cap Spider Pincushion

Just in time for Halloween, I've put together a quick little project to add a dash of fun to your sewing area. That's if you can get your...ahem...three kids to stop playing with it.

Here are the craft supplies you'll need:
1-4 inch circle (spider body) and 1-2 inch circle (spider head) cut from your choice of fabric
Coordinating thread
1 bottle cap
2 beady red straight pins (spider eyes)
4-5 inch pieces of black craft wire (spider legs) and 1-1 inch piece of craft wire (spider palps)
Fiberfill
pliers, wire cutters, fabric scissors, needle

To make the spider body, straight stitch around the edges of the 4 inch circle. Then pull the thread slightly to gather up the edges. Stuff with fiberfill. Insert bottle cap. Now gently pull the thread to enclose the fiberfill and bottle cap in the fabric. Stitch to secure the bottom of the spider body. To make the spider head, repeat the above steps with the 2 inch fabric circle omitting the bottle cap.

Now attach the spider head to the body with the sewn end of spider head facing the body so that your stitching doesn't show.

Stick the beady red straight pins into the spider head for eyes. Just under the eyes insert the 1 inch piece of craft wire. These are the spiders "pedipalps" or in simpler terms "the little thingeys that stick out by the mouth that make a spider "spiderish"."

Next, carefully insert each craft wire through the bottom of the stuffed spider body to make a total of eight legs. Use pliers to shape the legs like so.

Place the completed spider pincushion on a doily web. You may just want to keep her out all year long. She does know a thing or two in the sewing department.

Sunday, October 18, 2009

Have you been "BOOed"?

My kids' favorite pre-Halloween activity has got to be the neighborhood "ghosting" or "booing" that happens about this time in October. If you're not familiar, every year some on-the-ball neighbor starts the fun by filling two or three bags with candy along with other little surprises. Also enclosed in the prepared treat bags is the poem above and a paper ghost. Houses are then selected to "BOO." Booing (the verb) is defined as placing a treat bag on a front doorstep, ringing the doorbell and running like CrAZy to avoid being seen. The lucky recipients of the goodies, then place the paper ghost in their window and prepare treat bags for a couple more houses. Thus the Ghost/Boo is spread throughout the neighborhood. It's great fun both to be Booed and to Boo. And not just for families with kids. We Boo childless homes and often include spirits of the liquid kind.

Our family was booed several nights ago. This year we don't have a clue as to who it could have been other than a very generous ghost. Our ghost delighted my kids with a candy called "bat droppings" (wow did they think that was funny...a little too funny) and a variety of other much appreciated goodies.


Now that we've been marked, we're preparing our bags and scoping the neighborhood for unghosted houses. Tonight we'll be out after dark. In running shoes.

Wednesday, October 14, 2009

how about a little pattern with that smile?

This morning I turned around from my computer and saw this....a sight equal to about three or four cups of coffee for sure. WOWZA, did that ever wake up my eyes. Do ya think she picked that rug on purpose?! Let's just hope she can find socks to match.