Tuesday, September 29, 2009

Finding JOY

When I entered the scene of a particular yard sale a month or so ago, I almost turned around and walked right back out before doing a thorough investigation of the goods. At first glance, the sale seemed to have an abundance of overpriced Tupperware and plastic novelties. But since I had taken the time to stop the car, I figured I'd at least check out the pile of books on a back table. And that's when I saw it. A small box shoved to the side. I gulped. Vintage scrabble?! My heart skipped a beat. There wasn't a board, but the letters and letter racks were enough for me. With the asking price of 50 cents for the set, I realized that some people value Tupperware, while others prefer vintage letters. Absolutely nothing wrong with that.

I knew those little blocky letters would be great in a mixed media piece, but I also realized they were cool enough to stand on their own. So I spelled out our name and let them rest on the light switch plate in our entryway. Hubby please stop reading...

(actually they are attached to the wall with a little dab of hot glue. Yes, I was aware that the painter of the house would not be happy with the decision to take a glue gun to the walls, but at least it's not hay or plastic flowers, right? ...anybody see those Trading Spaces episodes??!)

Hubby continue reading...
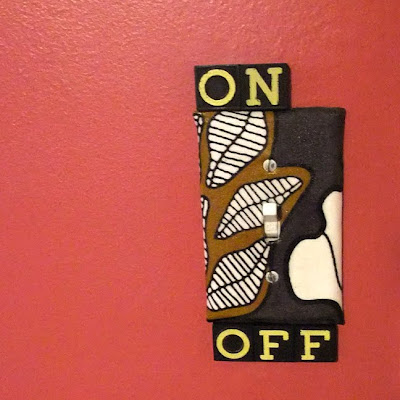
I also came to the conclusion that my fabric covered studio switch plate could benefit from letter additions so I "attached" more tiles. I love spelling out the obvious.

Less daring I suppose is choosing to display a word on one of those charming, old wooden racks. The X is on its side on purpose. You get it right?!

This also spells what to do when you discover how your wife attached scrabble letters to the walls. XOXO : )

Wednesday, September 23, 2009

Nature is painting.

Is that a gorgeous palette or what?

Happy first day of fall. My favorite season.

Monday, September 21, 2009

Sweet Sweater Rosettes

The past week has been filled to the brim with design work, kid's homework and activities plus all the usual. That doesn't mean that I haven't been dreaming of new projects. Over the weekend, I took a crafty time out and made a half dozen or so of these happy rosettes from recycled felted wool sweaters. The idea stemmed from a rosey wreath project by Betz White in the new Holiday Crafts magazine by Better Homes and Gardens that I'm planning to make very soon.

This tutorial focuses on a hair clip, but the idea can easily be adapted for pony tail holders, headbands and pins.


In addition to felted wool (in the colors of your choice), you'll need a 3/8 inch coordinating ribbon, a hair clip, fabric scissors, fabric glue and a glue gun.

To felt wool: Place your thrifted or unwanted 100 percent wool sweaters in the washing machine. Wash on the HOT cycle. Place the sweaters in the dryer. Basically do all that you would never dare do with 100 percent wool sweaters and feel very rebellious. Next, go over to your local tattoo parlor...kidding. Do that after you make your rosettes.


For the patterns, left click on the above image and print. Your circle pattern should be approximately 3 inches. If for some reason your circle prints larger or smaller than three inches, adjust the print percentage as necessary.

Using your pattern, cut a circle from the rose wool color. Then, cut a spiral shape using the pattern as a guide. It doesn't have to be perfect (no flower is) so wing it with confidence.

Starting from the outside of the spiral, use fabric glue to attach at the bottom edge of the flower. Wind to shape the rosette.

When you get to the end of the spiral, glue the flower to the end of the wool like so.

To decorate the hair clip, take a coordinating color of 3/8 inch wide ribbon cut to 4 1/2 inches in length. Starting from the back of the clip, hot glue the ribbon up, around, over and under the clippie.

Next, cut two leafs from the leaf-colored felted wool using the pattern as a guide. Hot glue the leaf shapes to the clip followed by the rosette.

Make a rosette to match every outfit. Take a deep breath, smile and go back to the real world. Tattoos optional.

Friday, September 11, 2009

Piecing together our days

Now that the two oldest kids are back in school we're not seeing each other as often as we did over the summer. My 5th grader hardly needs a prompt to give me a complete rehash of her day, but the second grader is another story. When I ask how his day went every day is... (one word said very tony-the-tigerish) "Greeaaaaaat" (and by the way I have proof that isn't always the case, but we won't go there.)

Having an activity to come home to that doesn't plug in or require batteries has been my trick to find out more. Not only does the simple process of putting a puzzle together relax, it brings out stories that otherwise might not be shared.


Besides being a great social activity, solving and putting together puzzles calls for patience and brain power. It helps melt away stress, stay focused and work that right brain.

I won't lie...having 1000 pieces laid out on my dining room table for days on end makes me a little nuts, but it's worth it. I'm finding all sorts of pieces, I would otherwise have missed.

Monday, September 7, 2009

Extra! Extra!

I hope you all had a fabulous weekend. Ours went about as fast as the rest of the summer which was pretty fast. Now it's time to look for pumpkins and gourds and to settle into the routine that the school year brings. errrr...excuse me...what did you say? ohhhhh...you're wondering about that wooden newspaper carrier?! Well, I'm glad you asked. He holds under his arm my very first e-newsletter which is almost ready to deliver to subscribers.

If you haven't yet signed up look over to the sidebar on the right of my blog>>>>>>>>>>>>>>>
see that little box that says "subscribe to my e-newsletter?"

All you need to do is enter your e-mail and you too will receive the "art just for fun" e-newsletter which includes insider tidbits along with valuable coupons for my etsy shop. Plus every once in awhile I'll be having subscriber giveaways. It'll be fun.

I promise you will not be overwhelmed with mail as my goal for e-news is just once every month or two. And so you know, this guy has strict instructions about spam...no credit card applications, no silly jokes, no chain letters, etc. Plus you can always unsubscribe. (I'll be a little sad and miss having you, but I'll understand.)

Now I've got to go catch that carrier. He has deliveries to make.

Friday, September 4, 2009

That sure went fast

Enjoy your last ride of the summer over this long holiday weekend. I'll be laboring inside way more than I would like with looming design project deadlines, but you can be sure we'll still sneak in some warm weather fun. See ya on the other side of the weekend!

Wednesday, September 2, 2009

this is NOT a 'how to upholster a chair/bench' post

I'd been looking at that "before" bench for a loong time not loving the dark, fishing motif fabric. Fabric that I had agreed to in another lifetime when my new hubbie had far more say in the decor of things. ; ) Almost immediately after the pillow revelation and the trim find, it finally clicked that I had nothing to lose. I would and could upholster the pieces myself rather than take them to a place after I found an extra couple hundred bucks lying around. It should be noted that I have switched out fabric on simple things like dining room chairs and headboards so I get basic fabric covering and stapling. Pieces with sides and a trim factor was the step above what I had done in the past.

Along with trim purchased for no more than $1 when you divide up my amazing lot, I also bought this heavyweight, cheery fabric at a garage sale for less than $5 total (enough for the bench, two pillows, the sides of two chairs plus ample leftovers.)

Now here's what this post is really all about. I mentioned with the pillows that taking things apart leads to bells going off. It all clicked once I could see how the pieces were cut and sewn together. I finally see the purpose of dissection in biology class. You can read about it and look at pictures, but once you see the actual insides of something...ahhhhhh that's were learning occurs. And with that I went and got a little crazy with the chairs...

I did a two-tone kind-of-thing with the same trim I used for the bench. All of that upholstering for a grand total of $6 plus a little sweet time. The moral of my story (besides 'garages sales are your friends') is If you see something you wanna make (sewing or otherwise) a little dissection goes a long way in figuring just how to do it.

Tuesday, September 1, 2009

Pillow Revelations

I'm discovering with sewing that I need LOTS of visuals to "get it." Reading a pattern or book doesn't always click with me, but visuals do almost immediately. I'm also finding that the next best thing to a step-by-step pictorial guiding the way is actually taking apart what I'm interested in making. After acquiring that box of trim, I immediately wanted to make fancy trimmed-out pillows. The kind of ornate pillows that I had around, but always assumed only a pillowperson could make. However, with my building confidence, I reasoned that those skills couldn't be that far out of my reach. Rather than buy new pillow forms, I decided to simply take apart my trimmed pillows that I wasn't exactly fond of. The goal was to figure out how they were constructed and recover in my choice of fabric + trim.

With my seam ripper in hand, I did just that. I carefully dissected a pillow. I learned how the trim was attached and backtracked in my head just how this pillow was made. It all clicked. Like when you figure out something foreign and suddenly it's right there and you can't believe you ever thought it was hard in the first place?!

Although I had originally intended to choose different trim it became clear to me that I should repurpose the green trim I had just removed. It complimented my new fabric perfectly and was still in good condition. I used the old plaid fabric squares to measure new floral ones and carefully sandwiched the trim back in just like the professional pillowmaker before me had done.

Sewing a pillow with trim is hardly different than making a pillow without trim (again, this to me equals major Revelation. Do you hear the bells?) One more to switch out.

A tired plaid pillow is now a fresh floral. And I sure learned a lot about trim. After that, I built upon this easy pillow trim lesson by reupholstering the chair, a rocker and a bench with new fabric and a corded trim. Believe it! Visuals coming later this week. : )

Saturday, August 29, 2009

A whole lotta trim

Yards of this...


and yards of that.


Candy ropes...


and fiber goodness.


Every once in awhile the dreams I have of trim and fabric come to life. Last Saturday, I stumbled upon not one, but two interior designer garage sales. The entire box above (filled with yards and yards of eye candy) was happily mine for $12. Whole pieces taller than me. I still can't believe it. And wait until you see the fabric. This means I can conduct my sewing experiments without the stress of ruining trim or fabric that I paid retail price for. No worries if I cut the fabric wrong...it was only $5 total for 8 leftover yards. So if you thought garage sales were all about dusty nicknacks and ugly neckties think again. Your dreams are out there too my friend.

Apparently, I'm not the only one impressed. Trimmed up projects coming soon.

Thursday, August 27, 2009

A book by any other cover would not be the same

Back-to-school week is something I'm never ready for. Going from "what should we do today" to a scheduled day beginning with breakfast at seven and ending later that afternoon with activities and homework to follow is quite a jolt. Taking the time to sew fabric book covers last night was definitely not on the schedule, but maybe that's why I wanted to do it so badly (rebellious I know.) It might not have happened, if I hadn't stumbled upon a relatively easy tutorial for fabric book covers over at CRAFT moments before we tackled book covering homework. All of those bare texts needed to be protected from the daily assaults of grade school.

Bright and interesting patterns will keep my eager students homes away from home nicely decorated. We even used a pink, fuzzy kind of fabric that will make a soft landing spot for a head should the plight of "The Ancient World" become too overwhelming. Just giving them another reason to love their books.

Monday, August 24, 2009

i love back-to-school?

hmmmm...still undecided over here. While I do appreciate having more time for uninterrupted work, I'll miss the laid back days the summer brings. I think my kids have mixed feelings too. They love seeing their friends and moving up a grade, but at the same time school is a full-time job with work involved. My kids (with the exception of the preschooler) go back tomorrow so we're spending the day making sure we have all of the supplies on the list.

In addition to the first case back here, I finished sewing personalized pencil cases just in time for my other two back-to-schoolers. They got to pick their fabric and I took it from there.

My second grade boy...what more can I say?

In the spirit of back-to-school, I'm including my lunch survey which ran in the December/January edition of Family Fun. You can go to Family Fun to download a copy or since you're here scroll over to the right in my "Printables" section. Click on lunch survey to read about the inspiration and then click on the survey itself to print. Fold this up with a pencil and place in their lunchbox. You'll find out all kinds of tidbits about those first days of the new school year.


Another tradition we've had around here is a back-to-school cake. There's nothing like a cake to sweeten a special day. For this cake, I used the basic plan of the Family Fun School Bus cake. Since we don't have bus service, our method of transportation is minivan carpooling. I adjusted the school bus cake as necessary including the "harried mom driver." I think we're almost ready. I love back-to-school. And repeat.

Thursday, August 20, 2009

Taking on the Chica's Challenge

When I stumbled upon a call for entries for the Crafty Chica Tote Bag Challenge, it made me wonder if I was ready. Ready to graduate from zippie pouch to tote bag. It seemed like the perfect opportunity to give it a go.

Making slight modifications, I built off what I had learned from zippie pouches. This time, I created straps and sandwiched them between the outer fabric and the liner. I also squared off the corners of the bag's bottom so it would be nice and roomy for a beach towel or whatever else.

One goal of mine in making this bag was to buy nothing new (that in addition to making it look like a bag in the first place.) That large piece of stripey fabric was a heavy weight fabric sample that I purchased from an interior designer's $1/swatch yard sale awhile back (awesome sale...goosebumps just thinking about it.) I used a water resistant type of white fabric for the liner.

Here's where I really had fun. I started the pocket by making a quilt sandwich...liner, batting and pink felt on top. Then using a variety of fabric scraps, ribbon, a vintage vinyl tape measure and even a clothing tag, I appliqued the pocket with my sewing machine. I created the butterfly pocket much like I would a painting or collage. I used fabric as my paint (cutting pieces of all shapes and sizes) and the sewing machine became my brush (adding line and texture.) I only broke three needles...I'm working on that. A needle is not quite the same as paintbrush. To finish off the pocket art, I applied gold and silver fabric glitter.

After attaching the pocket to the bag (before the bottom was stitched up), I added red ball fringe to the top. Initially, I tried to sew the fringe, but realized that wasn't such a bright idea. The little bally things were getting in my way and the zipper was in there along with the liner meeting the top, etc. etc. In the end, I used fabric glue which worked much better and saved my sanity.

Here's me with my first ever bag. And the icing on the cake...I was one of three runners up in the Chica's challenge! My prize, besides adding tote bag to my sewing resume, is a crafty chica bobblehead and a gift certificate to the MakerShed store.

I definitely see more bags in my future. Next time I promise step-by-steps, keeping it real (broken needles and all!)

Monday, August 17, 2009

Chalk it up

Here's a summer project that's been on my list. I've had a quart of chalkboard paint in my studio closet for the longest time. My original intention was to add some chalkboard real estate to the basement/kids area. However, my recent read of Jen's blog about her chalkboard paint tray transformation inspired me to do something similar, but I changed my chalk tray up with a button twist. (disclaimer: please don't worry as the poor children weren't left out of the quart...this tray was in addition to giving them chalk space, but that's another post.)

If you don't have one of these that you're willing to transform, don't fret. Any respectable thrift store will have a few to chose from. I purchased my silver tray at a yard sale for 25 cents. I wanted something simple with an easily embellish-able edge.

First, I primed the entire tray--front and back--with a spray primer (don't skip this step...it makes tray painting so much easier!) Next, I used white spray paint to cover the entire front and then back of the tray. After that was dry, I applied chalkboard paint to the inside of the tray leaving the rim white. I needed two coats to get maximum coverage.

Let's take a moment to talk about my button collection. I've been snatching them up for years at thrift stores and yard sales. Is it possible to have too many buttons?! I was proud of myself for actually using a small part of my button stash for this project. I tend to have some hoarding characteristics when it comes to buttons so this was good therapy.

Back to the tray, starting at the inner edge of the rim (where the black meets white), I attached various sized buttons. It's kinda like a jigsaw puzzle fitting the right size button into the space. I kept my button palette mostly in the white family, but inserted a few chalky colored buttons for interest.

tahDah! I positioned my finished plate on a plate stand (a stand that was an ugly bronze, but a quick coat of black spray paint changed all that) and wrote my welcoming message.

I'll undoubtedly personalize the message for the various family and friends that visit and stay in our guest room over the year. We love our visitors, so I'm very excited to have this extra welcoming touch.